Monday, October 22, 2012

PHP Email Forms

A php email form is one of the best way to create dialog between you and whomever you're communicating with on the web. When I was making my website this was one of the things I refused to compromise on, I had to have a php email form. The process itself is rather simple and it starts with the basic HTML email form as you can see below.


Above: HTML email form

The HTML email form provides the interface for the php script so when it is submitted it can send to the specified email address. The php script below controls how the submission will be executed, more specifically: When to execute, what to send, where to send it, and how the information will be formatted. I took the liberty of commenting all the code to make it easier to understand so others could use it as well. The only php I need to continue to add is the email validation to guard against bad information retrieval. On the whole using php to control your email form is convenient, safe, and makes communications a lot easier.


Above: PHP email form code

Wednesday, October 17, 2012

JavaScript Animations: Fade In

I recently added some JavaScript functionality to my portfolio website in the form of a "fade in" animation. I had to run it through trial and error in order to troubleshoot the problems I was having with it. I started out using a button system with a non jQuery solution using just JavaScript. I soon found out that it was very buggy, and so I ended up going with the jQuery solution after all. This syntax was a lot cleaner and simpler than the straight JavaScript I was using before.


Above: JavaScript fadeIn() syntax

This syntax appears at the end of the html because I wanted the function to operate after everything else had a chance to load. This reduces flickers and ticks on the screen which something I had trouble with before using the jQuery. I linked the latest jQuery library I felt comfortable with which was v1.6.3 and it seemed to work out great.


Above: jQuery library link, and CSS for JS users and non-users

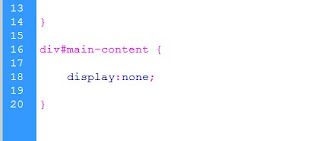
I had to use two different styles for JavaScript users and non users in order for my page to show up in all browsers. This doesn't punish the user that doesn't have JavaScript enabled and I found that it is a cross-compatible solution to the problem. Here are the style commands, and yes they are pretty simple but still required.


Above: CSS for JS users


Above: CSS for non JS users

So basically I wrapped the body material in a "div tag" and I set the id="main-content". This allowed me to hide it without messing with the "body tag". The result is a smooth fade in animation that uses a jQuery library for the heavy lifting. I highly recommend using the jQuery method for animation and adding general functionality to your site.


Friday, October 12, 2012

Digital Fine Art Printing: Photography Proof

I'd like to share an example of my digital photography in an "8.5 x 11" print proof using Epson Velvet digital Fine Art paper. The only difference that I could tell from the screen to the printing was the amount of detail brought out by using the high-pass overlay feature within my print. I had much more delineation of color noise on my edges using the high-pass overlay and viewing it on the computer than I received from my print proof. Basically the color noise I saw on the screen was hyper sensitive detail that didn't translate to the final image. The pigments behaved in a different way on paper than the screen lead me to believe. This is a crucial piece of information for me to understand and is just one of the many things I have learned while learning about the digital fine art printing process.


Above: Original digital image


Above: Printed proof on paper

Sunday, October 7, 2012

Photography

Most recently I have been getting into photography, and this is because I'm currently learning about digital fine art printing. This is a printing process that is top of the line and of gallery quality for digital images. The process takes place on archival papers provided from manufactures such as Hahnemuhle and Epson. These papers have a lower chemical counts than normal paper does enhancing the image quality. The photos I took for testing were taking in and around Moscow, Russia. I took approximately 1,700 photos for the entire trip give or take and I had some really cool shots. The editing came out nearly flawless and I was very impressed with the result. I was working in Camera Raw on a color corrected screen for most of the editing process. These are my results:


St. Basils


Wall: Kremlin


Tower: Kremlin


Wall: Sergiev Posad